
This is how my first successful attempt at etching copper using a saltwater solution and battery charger turned out. I don't think it's that bad and I learned alot in the process. If you read my first post about this process you will see that my initial attempt turned out to be a total failure. Since then I have finally tweaked the process and found what works. The following is a step-by-step tutorial on what I did this time to get the above result.
Items you will need:
 You will need a container preferably with a screw on lid capable of holding one (1) liter of DISTILLED water. I emphasize distilled because in my first attempt I used tap water and then my alter ego, the biologist with the very expensive biology degree that I obtained years ago, kicked me in the pants and reminded me that tap water contains additives i.e chlorine, flouride, etc. that may interfere with the reaction in ways that we don't want.
 You want to use Kosher Salt which is basically just natural salt without any added iodine. (Remember, normal table salt has iodine added as a nutritional supplement to prevent iodine deficiency which causes thyroid problems. You don't want the Iodine in your salt solution so get KOSHER) The salt in the photo is a pretty large container that I got at Wal-Mart for $0.38. You will be using quite a lot of salt per liter so for $0.38 a container go ahead and stock up.
Now if you read my previous post about my first attempt at this method you know that I was using 2 tbsp. of salt per liter. Hello! My biologist (haha) told me that this was obviously not enough, I don't know what I was thinking at the time. Probably, just nervous about playing with electricity and water. LOL. Sorry I digress sometimes.
So what you want to do is to actually get a saturated solution meaning absolutely no more salt will dissolve into solution. You will know when your solution is saturated when some of the salt crystals collect on the bottom of your 1 liter container no matter how much you shake it and try to get it to dissolve. I found that it took 1.5 cups of salt to reach this point.
To mix the solution this is the steps that I followed:
1. Place a liter of distilled water into your container.
2. Heat the water in the microwave for about a minute. (make sure you leave the lid off the
container while heating)
3. Pour 1 cup of the Kosher salt into the warm water. Screw on lid and shake vigorously. Let the
solution stand for a little while and make sure all of the salt is dissolved.
4. Remove the lid and repeat steps 1-3 adding only 1/2 cup of salt at a time until the salt is no
longer dissolving and crystals can be seen at the bottom of your container.
Now set your solution aside and get your power source ready.
You will need:
A plastic or glass container about 4 inches deep to hold your salt water bath. As you will see I used the bottom portion of an old milk jug. If you use the milk jug just make sure you rinse it out really well first. Other options would be those disposable lidded containers by Glad or any pyrex container that meet the depth requirements. Just know that whatever container you use you cannot use if for food storage ever again. (DO NOT USE A METAL CONTAINER EVER!)
A power supply. I chose to use a 12V batter charger that you
plug into an A/C outlet. Some sources state that you can also use a car battery the same as you would the battery charger. I can't see why you couldn't if you would feel more comfortable with that. I like the battery charger because it already has the color coded terminal cables attached. Remember Red is always the positive terminal and Black is always the negative terminal.
 into an A/C outlet. Some sources state that you can also use a car battery the same as you would the battery charger. I can't see why you couldn't if you would feel more comfortable with that. I like the battery charger because it already has the color coded terminal cables attached. Remember Red is always the positive terminal and Black is always the negative terminal.
Essentially with this process of etching you are making a cathode, a negatively charged electrode, and an anode, a positively charged electrode. The way the system works is the piece to be etched is attached to the positive (red cable) terminal making it your anode(+). Then you attach the negative (black cable) terminal to a piece of metal making it your cathode (-). The salt water solution is a great conductor of electricity and therefore allows the negatively charged ions of the cathode to PULL AWAY the now positively charged copper ions which produces an etch mark anywhere that the metal attached to the positive terminal is bare.
Ok sorry to go all Bill Nye on you guys, but it helps to have a very basic idea of what is actually happening here and I needed to introduce this to you in order to explain the following steps.
Prepare the Cathode (-): It is best to use a like metal for the cathode as the metal that is being etched. In my first attempt I used a piece of scrap copper about the same size as the piece of copper that I was attempting to etch. Since I wasn't at all happy with those results, I decided to build a super cathode. So I took two bolts that you can purchase from any hardware store and thin gauge copper wire also purchased from the hardware store. I wrapped the copper wire very tightly around each bolt then I layed the bolts side by side and wrapped the copper wire around the pair binding them together. I then used 14 ga heavy copper wire to fashion a hanger for the cathode. You will attach the negative terminal of your power source to the hanger. Never allow the terminal cable to become directly submerged in the saltwater bath.

I forgot to get a pic of this before using it.
This is what it looks like after being in the salt water.
Prepare the Anode (+): Remember your anode is essentially the piece of copper that you want to etch simply attached to the positive terminal of your power source. Cut a piece of copper sheet slightly larger than you want your finished piece to be. Clean your copper really well. I use a green scotch brite scrubber and running water. Once it is clean handle it only by the edges. If you touch the clean face of the copper the oils in your fingers will leave a fingerprint that will be etched into your piece. Now transfer your image onto your copper. Other sources site several ways of doing this:
1. draw the design onto the copper using a permanent ink pen (sharpie marker)
2. stamp a design on using Staz-on permanent ink stamp pad
3. photocopy a design using a toner based copier or LASER printer (Inkjet printers won't work).
then use a hot iron to transfer the toner from the paper onto the metal. It you want to etch
words using this method make sure you reverse the type on the paper or else your type on
metal will be backwards.
4. photocopy an image onto PnP blue film and use an iron to transfer that to the metal.
For the example piece at the beginning of this post I first tried the stamping method with staz-on ink. It allowed for a very faint etch and then the ink was dissolved. To finish the piece and get the etch that you see in the picture I removed it from the bath and disconnected it from the power source. Then I traced over the light etch with a sharpie marker and returned the piece to the bath. The sharpie held up quite well but I believe having to retrace the design halfway through the process caused the etching to look somewhat distressed as you can see in the photo. I have also used the method of transferring a toner based photocopy using a hot iron with quite a bit of success. I haven't used PnP blue paper because it is crazy expensive. Remember that the dark areas of your image will be raised areas after etching. The areas that are bare metal will be etched away leaving a recessed area, so adjust your images accordingly. If you have an image that you want to change simply use photo editing software to invert the colors. Also it is best if you change color images to black and white.
Don't forget to cover the back of your piece with some type of resist, you don't want to etch both sides or else you will get holes eaten into your piece. You can cover the back with tape but make sure you have some Goo Gone to remove the adhesive residue afterward. You could also try using masking fluid like water color artists use to mask out areas on their paintings or you can coat the back of the piece with nail polish and remove it when you are finished with nail polish remover.
Now punch a whole into the extra copper at the top of your piece. Run a piece of wire through the whole making a hook by which to hold your piece int o the bath. Attach the positive terminal to the piece of wire. You never want to submerge the terminal cables directly into the bath.
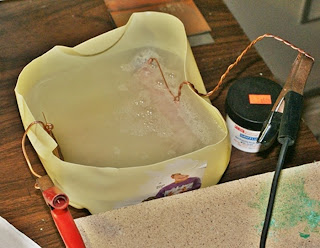
The completed set-up with terminal cables attached:
This is what it looks like after being in the salt water.
Prepare the Anode (+): Remember your anode is essentially the piece of copper that you want to etch simply attached to the positive terminal of your power source. Cut a piece of copper sheet slightly larger than you want your finished piece to be. Clean your copper really well. I use a green scotch brite scrubber and running water. Once it is clean handle it only by the edges. If you touch the clean face of the copper the oils in your fingers will leave a fingerprint that will be etched into your piece. Now transfer your image onto your copper. Other sources site several ways of doing this:
1. draw the design onto the copper using a permanent ink pen (sharpie marker)
2. stamp a design on using Staz-on permanent ink stamp pad
3. photocopy a design using a toner based copier or LASER printer (Inkjet printers won't work).
then use a hot iron to transfer the toner from the paper onto the metal. It you want to etch
words using this method make sure you reverse the type on the paper or else your type on
metal will be backwards.
4. photocopy an image onto PnP blue film and use an iron to transfer that to the metal.
For the example piece at the beginning of this post I first tried the stamping method with staz-on ink. It allowed for a very faint etch and then the ink was dissolved. To finish the piece and get the etch that you see in the picture I removed it from the bath and disconnected it from the power source. Then I traced over the light etch with a sharpie marker and returned the piece to the bath. The sharpie held up quite well but I believe having to retrace the design halfway through the process caused the etching to look somewhat distressed as you can see in the photo. I have also used the method of transferring a toner based photocopy using a hot iron with quite a bit of success. I haven't used PnP blue paper because it is crazy expensive. Remember that the dark areas of your image will be raised areas after etching. The areas that are bare metal will be etched away leaving a recessed area, so adjust your images accordingly. If you have an image that you want to change simply use photo editing software to invert the colors. Also it is best if you change color images to black and white.
Don't forget to cover the back of your piece with some type of resist, you don't want to etch both sides or else you will get holes eaten into your piece. You can cover the back with tape but make sure you have some Goo Gone to remove the adhesive residue afterward. You could also try using masking fluid like water color artists use to mask out areas on their paintings or you can coat the back of the piece with nail polish and remove it when you are finished with nail polish remover.
Now punch a whole into the extra copper at the top of your piece. Run a piece of wire through the whole making a hook by which to hold your piece int o the bath. Attach the positive terminal to the piece of wire. You never want to submerge the terminal cables directly into the bath.
The completed set-up with terminal cables attached:

Notice that the black handled cable is attached to the wire leading to the submerged copper wrapped bolts.
The red handled cable is attached to the wire leading to the piece of copper to be etched.
Neither cable clamp is touching the water.
The red handled cable is attached to the wire leading to the piece of copper to be etched.
Neither cable clamp is touching the water.
If you have your clamps set up correctly you should immediately see bubbles coming from the bolts. This is normal and exactly what you want it means it is working. If the bubbles are coming from the piece that you want etched then switch your cables around.

After about 10 to 15 minutes your water will look like this:

The mucky brown color is the copper particles being pulled away from the copper piece. Start to check on the progress of your etch regularly from this point on, about every 15 minutes or so. When you are happy with the depth of the etch remove the power source from the piece and remove the piece from the bath. Use the scotch brite pad and clean running water to clean the piece. Now you can patina the piece or whatever you would like and make it into a beautiful piece of art to wear.
I know that this is a really long post but I wanted to be as clear and concise in my instructions as possible so that you all could have great results when you try this method yourselves. I hope that everything made sense. If you have any questions please leave me a comment and I will try my best to answer them.
I have enjoyed learning how to do this new technique along with you all. I hope to do it again soon. If there is a technique that you would like to try but you feel uncomfortable with the procedure or components, let me know and I will consider it and maybe we can learn it together. Please feel free to leave comments and suggestions for future tutorials. Thanks for your patience and for taking a look. Have a great day.

After about 10 to 15 minutes your water will look like this:

The mucky brown color is the copper particles being pulled away from the copper piece. Start to check on the progress of your etch regularly from this point on, about every 15 minutes or so. When you are happy with the depth of the etch remove the power source from the piece and remove the piece from the bath. Use the scotch brite pad and clean running water to clean the piece. Now you can patina the piece or whatever you would like and make it into a beautiful piece of art to wear.
I know that this is a really long post but I wanted to be as clear and concise in my instructions as possible so that you all could have great results when you try this method yourselves. I hope that everything made sense. If you have any questions please leave me a comment and I will try my best to answer them.
I have enjoyed learning how to do this new technique along with you all. I hope to do it again soon. If there is a technique that you would like to try but you feel uncomfortable with the procedure or components, let me know and I will consider it and maybe we can learn it together. Please feel free to leave comments and suggestions for future tutorials. Thanks for your patience and for taking a look. Have a great day.

